
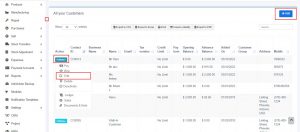
User Management -> Users -> Add New
Fill the user details, select user role, give a unique username.
Sales Commission Percentage (%): Provide the commission % for this user. This option gets applied if the commission agent feature is enabled.
Activate/Deactivate the user.
You can edit/delete a user.
Refer to the image below
The maximum discount this user can give during sales in the POS & sales screen. If you don’t want to have this restriction then simply keep this value blank.
Refer to the image below
Adding Roles
Every new business comes with some
default roles – Admin & Cashier.
Admin have
all permissions in the application.
Cashier have
permission to only POS section.
You can create a role by clicking on Add button -> Giving a role name and then selecting the appropriate permission for that role.
Sometime you may need to give a user access to a/some particular location(s) only. In this case, select the locations from “Access locations” permission. Select “All Locations” to give permission to access all locations for your business.
Roles permissions can be edited & Deleted.
Note: You must update the role of an existing user before deleting a role.
By default Commission Agent is Disabled. You can enable it from Settings -> Business Settings -> Sales. Sales Commission Agent drop-down.
You will see 3 different types:
Logged in User: If this option is used then the Logged in User will be automatically considered as the commission agent for the sales added by him. Meaning the user adding the sales will get the commission for the sales.
Select from User’s List: If this option is enabled then in POS & Sales Screen you will see the list of “users” present in your business. The user adding the sales will select the commission agent from the list of users displayed.
Select from Commission Agent List: If this option is enabled then in POS & Sales Screen you will see the list of “Sales Commission Agents” present in your business. The user adding the sales will select the commission agent from the list of “Sales Commission Agents” displayed.
Select the option as per your business requirements.
You can add commission % while adding/editing the User or Sales Commission Agent
To See the commission amount, Go to Reports -> Sales Representative Report.
Select the User for which you want to see the commission amount.
On selecting it will show you the detailed summary of Total Sale, Total Sale Commission & Total Expense. Also, the table below lists all the transactions.
NOTE: Sales commission is calculated without shipping or tax. Sales commissions are from the sales of the items, not the overhead cost such as taxes, freight, shipping, handling, etc.
After getting the commission amount,Nexa ERP have 2 ways to make payment for the commission.
Calculate the commission from the sales representative report and after paying the amount add it as an expense in Add Expense menu.
In Add expense, select the Expense-For dropdown
Contact Management
To view customer or supplier ledger
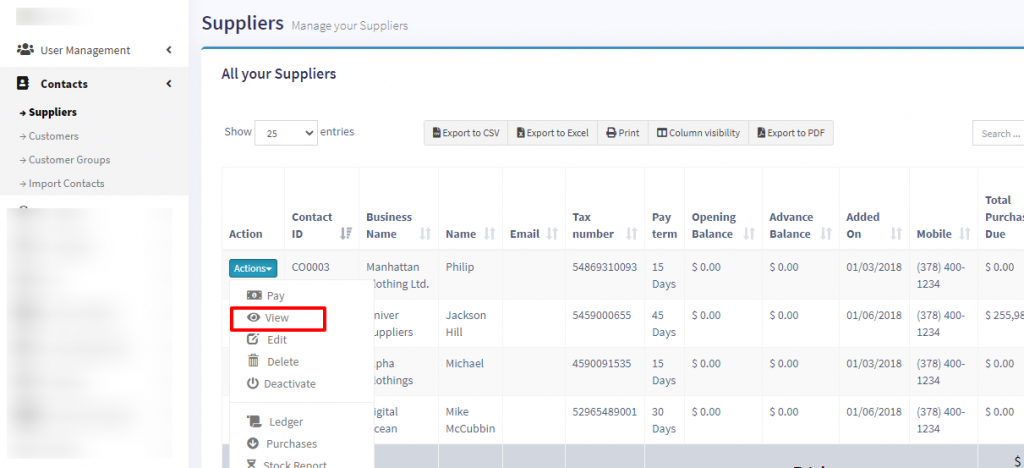
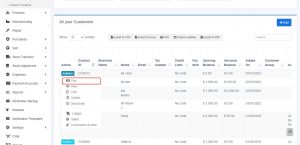
Go to Contacts -> Supplier/Customer and click on actions button
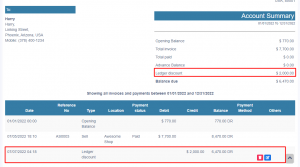
In that you will be able to see Ledger for the customer or supplier.
You can select a date-range and use the checkbox filters to show/hide certain transaction type.

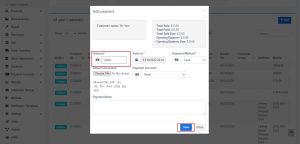
Discount for balance due amount can be added for customer/supplier.
Click the add discount button on the customer/supplier ledger screen
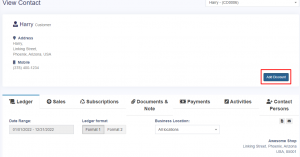
On clicking the button it shows a popup, enter the details and click save.
The discounted amount will be accounted for in their ledger.
NOTE 1: This discount can only be added by the admin and not by other users.
NOTE 2: Also, the Ledger Discount is different from the Sale Discount.
While adding a Ledger Discount it will not be reflected in Sale Discount because the invoice details are not added for the ledger discount. And it is not possible to find to which invoice the discount is added.
Opening balance is the balance contact (customer or supplier) have at the beginning of using the software.
Suppose you’re shifting the data from another software to Nexa ERP then the opening balance of the contact will be the balance amount which the contact has to pay/receive to/from you.
Opening balance for customer = Amount the customer has to pay
Opening balance for supplier = Amount you have to pay to the supplier.
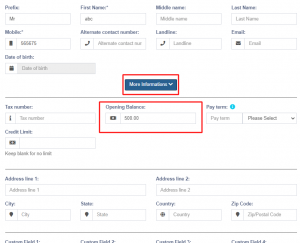
You can add an opening balance when adding/editing the supplier or customer. In the add contact screen, you will find the opening balance field.
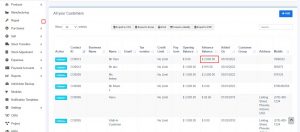
To view the opening balance of contact, go to List Supplier/customer, go to view, and on the view page, you will find the opening balance & opening balance due.
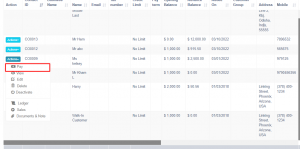
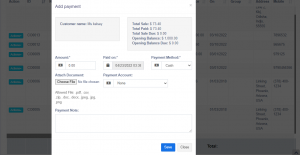
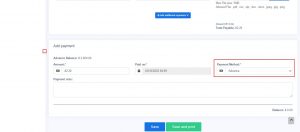
Adding payment of the opening balance is the same as any other payments. Go to list Customer/Supplier -> Actions -> Pay.
It will open a popup modal where you can enter the payment amount.
Goto Contacts -> Suppliers or Customer
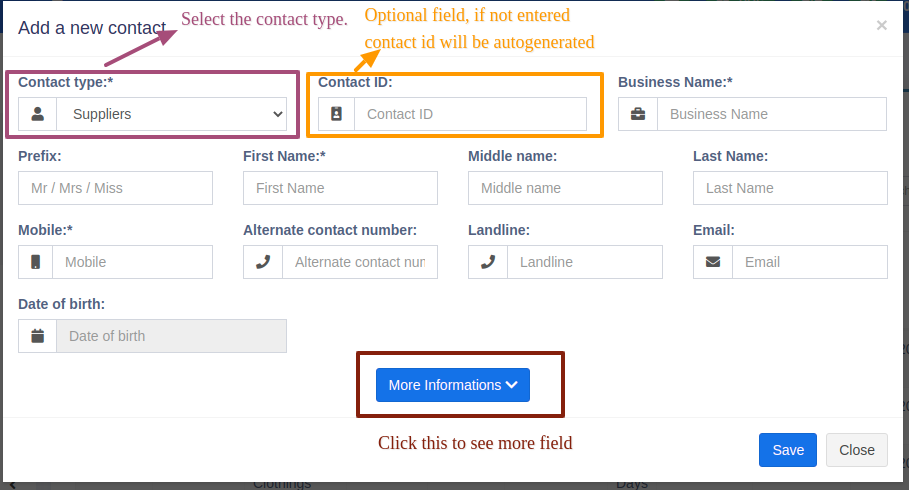
Click on add new contact. Select contact type – Supplier/Customer/Both
Based on the contact type selected – it will show the relevant fields. Fill the relevant details.
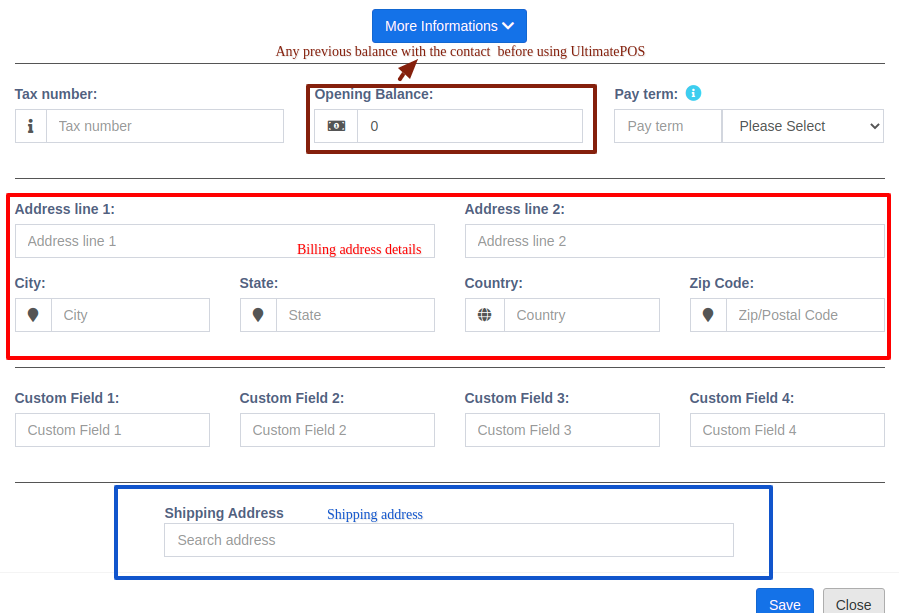
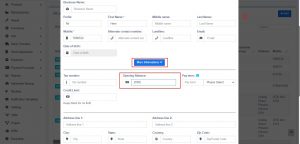
Click on More More Information button to see more field.
Pay Terms: This will help the system to notify you of any pending payments for suppliers & customers. You can specify pay term in either days or months.
Customer Group: Read details here.
Credit Limit: This is the maximum amount of credit that can be given to the customer. If in any sales the credit exceeds this amount then it won’t allow selling on credit.
Opening Balance: Opening balance of a customer or supplier before you start using Nexa ERP. So if there is any previous balance you can add here.
Advance balance: Sometimes customer/supplier pay/takes money in advance. This wil show the amount of advance balance paid or take by the customer/supplier respectively.
To view details about a Supplier or Customer click on View button. It will show the complete details along with the relevant transactions (Purchases & Sales) for that contact.
Pay Due amount: You can use this button to pay the due amount for a customer or supplier. This will pay the overall due amount for all invoices.
You can assign contacts(customers & suppliers) to a particular use by following the steps below.
In your pos\config\constants.php change the value of enable_contact_assign to true.
When adding the user check the label “assign to specific contact”.
Now when adding contact select the user to whom you want to assign.
If you want to change the default customer name “walk-in-customer” to something else follow the steps below.
Go to the database contacts data table.
Change the first name field to anything required.
Credit limits can be added to customers.
When the credit limit is reached the partial or credit sale can’t be sone for those customers.
To set the credit limit Go to Contacts > Customers > Action > Edit > More Information > Credit Limit.
Set this field blank for not having any credit limit for customers.
NOTE: Do not set the credit limit as 0 for having
no credit limit.
Credit Limit = 0 (the credit for the customer
is 0)
Credit Limit = blank (no restriction for credit
limit(infinite))
Advanced balance(to customers) is the sum of the amount that the business should pay for the customers.
Advanced balance(to suppliers) is the sum of the amount that the suppliers should pay for the business.
To add an advanced balance, Go to Customers -> customers/suppliers and click on the action button. Here you will find a pay option and click on it. Add payment pop up will be shown and add the required amount value and click on save button.
To make a purchase or sale using this advanced balance, add a sale or purchase. Select the customer/supplier that you have added advanced balance. While making the payment select the advance option and save it.
Opening balance(to customers) is the sum of the amount that the customers have to pay for the business.
Opening balance(to suppliers) is the sum of the amount that the business has to pay for the suppliers.
To add an opening balance, Go to Contacts->customers/suppliers. Either select the add button or click on edit for an existing user. There you could find a more information button, click on that and add the opening balance amount to be added for that user.
With customer Groups, you can classify a customer as Retail Customers, WholeSale Customer, Friends, Colleagues and whatever you will love to…
1. To add a “Customer Group” go to Contacts -> Customer Groups & Click on “Add” button.
2. It will show a popup asking for customer group name &
Calculation Percentage.
Calculation percentage is used to
calculate selling price.
Example:
– Suppose if the Selling Price set for a product Product1 is
$200
– Customer Group Name = Friend
Calculation
Percentage = -20
– Note: -20 (notice a
minus sign) or you may set it 20 = +20%
– And you have created a customer with Harry with Customer Group assigned as Friend.
– Now go to pos or Sell screen. Select the customer Harry and add the product1.
– You will notice that the selling price set for the product1 will be 200-20% = $160
This is how customer Group works.
Customer Group does an internal calculation and applied the calculation percentage to the selling price. It will not show a separate discount on the invoice or the pos screen.
This feature is highly useful when you have retail, wholesale or different customer categories.
You can view report for different customer group from “Customer Groups Report” or in other terms if you have retail and wholesale customer group you can see which type of customer group is giving more sale.
____________ END_____________