To add new tax go to Settings -> Tax Rates -> Add
Add a descriptive name (eg: “VAT@5%”) and specify the “Tax Rate%”
Sometime you will need to apply multiple taxes to an invoice or purchase. So you should create tax groups by combining multiple taxes.
To add a Tax Group – Click on Add Button, Give a meaningful name, select the tax you want to use in this tax group.
The tax rate of tax group will be the sum of tax rates of Sub-taxes added.
If sub-tax is edited the corresponding tax group’s tax rate will also get updated accordingly.
You cannot delete a Tax if it is used in a Tax Group.
Don’t add Tax Rates in settings
Go to Settings – Business Settings.
Uncheck “Enable inline tax in purchase and sell“
Uncheck “Enable Price & Tax info“
Select “Default Sale Tax” as None
NOTE: If you disable the inline tax in the purchase and sell, the Price Inc tax column will not be shown in the POS screen.
Payment accounts are like for example bank account. You can transfer money from one payment account to another, deposit cash in payment account, pay to a supplier, or deposit the amount received from a customer here.
Go to Settings ->Business Settings -> Modules
Enable payment ‘Account’ option
Save it.
After saving you will see the “Payment accounts” option will be visible in the left navigation bar.
Go to Payment accounts -> List accounts -> Account Types
Account type: to add an account type click on Add button and enter the name of the account type and submit. Keep the Parent account type unselected.
Sub-Account type: To add a sub-account type click on Add button, enter the name of the sub-account type and select the Parent-account-type.
When creating an account you can select the account type as per your need.
To create a payment account, Go to Payment Accounts -> List Accounts, click on Add button
Fill in all the details like name, account number, Account type, opening balance, Account details & notes.
Account Details: Here you can add any additional account details, like for example UPI ID, SWIFT code, BIN number, etc which vary depending on the accounts.
You can transfer funds between the payment accounts.
In the Payment Accounts -> List Accounts, click on fund transfer.
![]()
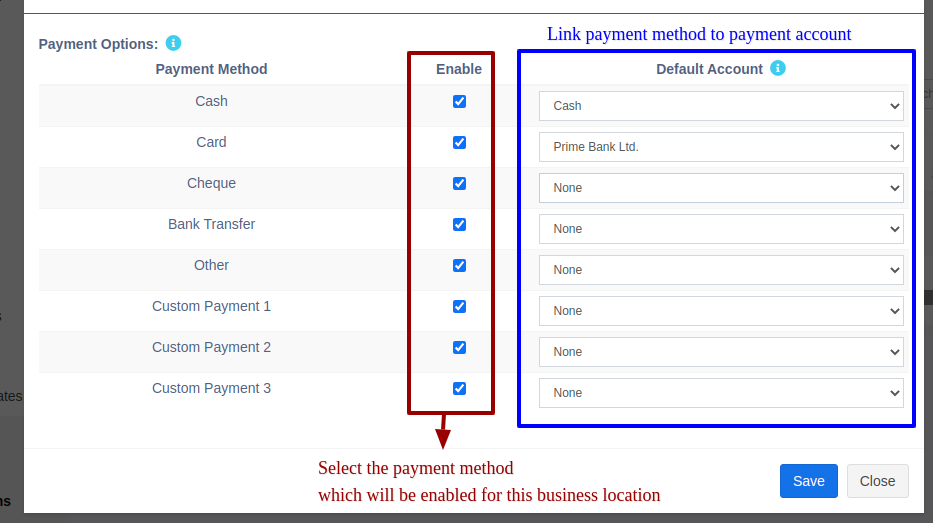
In Add/Edit business location you can select the default payment account for each payment method.
If the payment account is linked then when adding a payment for sales/purchase/expense, on selecting the payment method the payment account will be automatically selected.
Stock Adjustment helps you decrease the goods you hold in stock, you can enter manual stock adjustments. It’s generally used to write-off damaged stock, or to adjust quantities after a stock take.
To create a stock adjustment
First, go to “Add Stock Adjustment”
Select the Business Location & date
Select Adjustment Type (Normal Or
Abnormal). Normal Or Abnormal is generally used to classify
adjustment.
Generally Normal Adjustment meaning: Adjustment for
normal reasons like Leakages etc.
Abnormal meaning: Adjustment
for reasons like Fire, Accident etc.
Add the products & quantity you want to decrease the product.
Total amount recovered: Sometimes you can recover some amount from the damaged stocks, like from insurance claims, selling of scraps etc. If there is no amount recovered then you can simply make it 0. The recovered amount is taken into consideration when making a profit & loss report, it is added to the total profit/loss.
The quantities entered for each product will be deducted from the available quantities.
You can view the details of stock adjustment in “Stock Adjustment Report”.
Also, Stock Adjustment is used in Profit & Loss Report (P & L Report). “Total Stock Adjustment” amount is deducted from (P & L Report) and “Total Stock Recovered” amount is added to Profit & Loss Report.
Nexa ERP allows you to add expenses for an employee. Thie expenses can be Salary, Bonuses, Perks, travel expenditure or anything else.
– Simply create a category for the expense you’re adding. Adding relevant categories helps you to classify expenses and analyse them.
– Go to Add Expenses, fill the details, select the relevant category and select the employee name expense for fields.
– Add the expense.
– To view details of all expenses for an employee go to “Sales Representative Report” and select the User. It will show the total expenses for the employee. You can also view the list of expenses from there.
Expense for Contact (Customer or Supplier): To add expense for a customer or supplier select the customer/supplier name from the expense for contact dropdown.
Expense Refund:
To add a refund for an expense, add a new Expense with the “Is Refund” checkbox checked in the add/edit expense. You have to enter the refund amount and the refund payment details.
The refunded amount will be added to the Net-Profit.